
WPS methods
Wi-Fi Protected Setup (WPS), developed by the Wi-Fi Alliance, helps users quickly and easily configure WPA/WPA2-Personal (PSK) security on wireless routers and clients. WPS currently supports two methods: Personal Information Number (PIN) and Push Button Configuration (PBC). The specification also includes a third method, Near-Field Communication (NFC) but there are currently no products that support NFC.
The PIN method allows users to use a PIN (taken either from a sticker label or a utility screen or a web-based control panel) and enter it in the Access Point (AP) or client WPS device to connect. This method is mandatory for all WPS certified devices.
The push button configuration (PBC) method allows users to simply push a button, either an actual or a virtual one, on both WPS devices to connect. This is an optional method on wireless clients.
In both methods, WPS users are not asked to enter a network name (SSID) and wireless security by hand. The whole operation often takes few seconds and it does not exceed a two-minute period.
WPS Components
There are three logical components involved in WPS:
- Registrar: a device with the authority to issue and revoke credentials to a network. A registrar may be integrated into a wireless access point (AP), or it may be separate from the AP.
- Enrollee: a device seeking to join an access point or a wireless network such as a laptop, a cell phone …
- AP: an Access Point functioning as a proxy between a registrar and an enrollee.

Interface E is logically located between the Enrollee and the Registrar (physically, the AP can work as a proxy to convey the messages). The purpose of Interface E is to enable the Registrar to discover and issue WLAN Credentials to the Enrollee.
Interface M is the interface between the AP and the Registrar. It enables an external Registrar to manage a WPS AP. WPS uses the same protocol for setting up the AP Management interface as for issuing Credentials to Enrollee devices.
Interface A is between the Enrollee and the AP. The function of Interface A is to enable discovery of the WPS WLAN and to enable communication between the Enrollee and IP-only Registrars.
- Registrar: a device with the authority to issue and revoke credentials to a network. A registrar may be integrated into a wireless access point (AP), or it may be separate from the AP.
- Enrollee: a device seeking to join an access point or a wireless network such as a laptop, a cell phone …
- AP: an Access Point functioning as a proxy between a registrar and an enrollee.

Interface E is logically located between the Enrollee and the Registrar (physically, the AP can work as a proxy to convey the messages). The purpose of Interface E is to enable the Registrar to discover and issue WLAN Credentials to the Enrollee.
Registration Protocol
The Registration Protocol is defined and detailed in the Wi-Fi Protected Setup Specification v1.0 document provided by the Wi-Fi Alliance. The Registration Protocol accomplishes the following purposes:
- It helps to troubleshoot basic connectivity problems with the wireless channel.
- It provides demonstrative identification of the Enrollee to the Registrar and the Registrar to the Enrollee using out-of-band information, enabling the credential configuration function.
- It establishes the roles of each device (AP, Registrar, or Enrollee).
- It securely conveys WLAN settings and other configuration from the Registrar to the Enrollee.
- It establishes an Extended Master Session Key EMSK, which can be used to secure additional application-specific configuration functions.
The Registration Protocol is used for a variety of scenarios resulting in a few variants in terms of optional parameters. The principal version, a series of EAP message exchanges, is described as below:
Enrollee -> Registrar: M1 = Version || N1 || Description || PKE
Enrollee <- Registrar: M2 = Version || N1 || N2 || Description || PKR [ || ConfigData ] || HMAC_AuthKey(M1 || M2*)
Enrollee -> Registrar: M3 = Version || N2 || E-Hash1 || E-Hash2 || HMAC_AuthKey(M2 || M3*)
Enrollee <- Registrar: M4 = Version || N1 || R-Hash1 || R-Hash2 || ENC_KeyWrapKey(R-S1) || HMAC_AuthKey (M3 || M4*)
Enrollee -> Registrar: M5 = Version || N2 || ENC_KeyWrapKey(E-S1) || HMAC_AuthKey (M4 || M5*)
Enrollee <- Registrar: M6 = Version || N1 || ENC_KeyWrapKey(R-S2) || HMAC_AuthKey (M5 || M6*)
Enrollee -> Registrar: M7 = Version || N2 || ENC_KeyWrapKey(E-S2 [||ConfigData]) || HMAC_AuthKey (M6 || M7*)
Enrollee <- Registrar: M8 = Version || N1 || [ ENC_KeyWrapKey(ConfigData) ] || HMAC_AuthKey (M7 || M8*)
- It helps to troubleshoot basic connectivity problems with the wireless channel.
- It provides demonstrative identification of the Enrollee to the Registrar and the Registrar to the Enrollee using out-of-band information, enabling the credential configuration function.
- It establishes the roles of each device (AP, Registrar, or Enrollee).
- It securely conveys WLAN settings and other configuration from the Registrar to the Enrollee.
- It establishes an Extended Master Session Key EMSK, which can be used to secure additional application-specific configuration functions.
Enrollee <- Registrar: M2 = Version || N1 || N2 || Description || PKR [ || ConfigData ] || HMAC_AuthKey(M1 || M2*)
Enrollee -> Registrar: M3 = Version || N2 || E-Hash1 || E-Hash2 || HMAC_AuthKey(M2 || M3*)
Enrollee <- Registrar: M4 = Version || N1 || R-Hash1 || R-Hash2 || ENC_KeyWrapKey(R-S1) || HMAC_AuthKey (M3 || M4*)
Enrollee -> Registrar: M5 = Version || N2 || ENC_KeyWrapKey(E-S1) || HMAC_AuthKey (M4 || M5*)
Enrollee <- Registrar: M6 = Version || N1 || ENC_KeyWrapKey(R-S2) || HMAC_AuthKey (M5 || M6*)
Enrollee -> Registrar: M7 = Version || N2 || ENC_KeyWrapKey(E-S2 [||ConfigData]) || HMAC_AuthKey (M6 || M7*)
Enrollee <- Registrar: M8 = Version || N1 || [ ENC_KeyWrapKey(ConfigData) ] || HMAC_AuthKey (M7 || M8*)
EAP based setup based on external registrar
Station willing to connect to AP, sends out a probe request with WPS IE, request type set to enrollee.
 AP sends a Wi-Fi Simple Configuration probe response to the Registrar with
Response Type set to AP.

After this M1 to M8 exchange occurs. Enrollee (the station) may decide to associate to a WSC-enabled AP and initiate the registration protocol by sending message M1 to the Registrar; assuming that
the Registrar is not yet prepared to enroll the candidate enrollee it will respond with message M2D.
M2D – this message indicates that the Registrar is unable to authenticate with the Enrollee, but it is willing to provide descriptive information about the Registrar to the Enrollee.
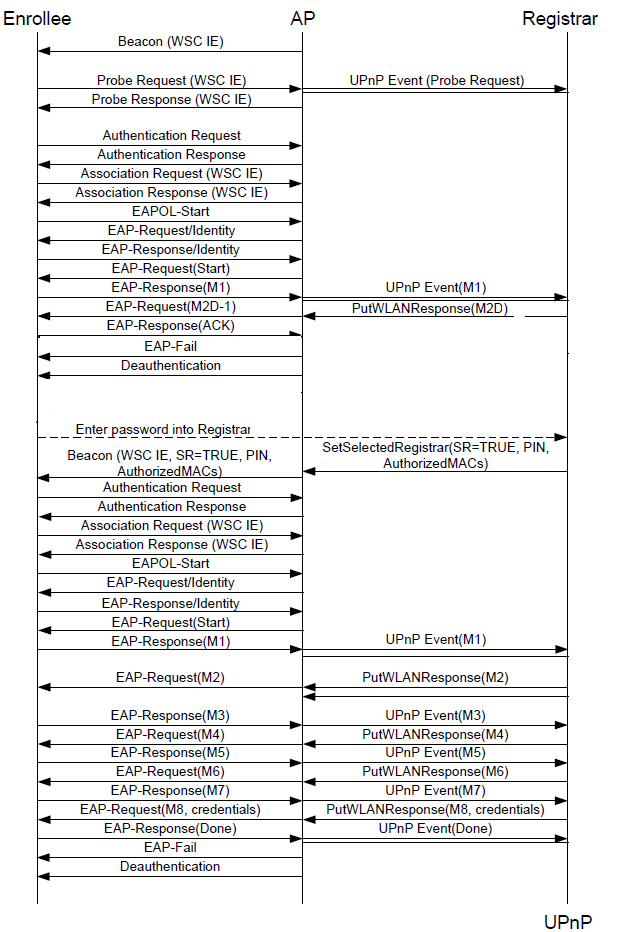 Phase 1:
1. The Enrollee sends its Discovery message using an 802.11 probe request. The
Discovery message is broadcast by the AP to all external Registrars.
2. The AP responds to the probe request with its own Discovery data.
3. The Enrollee connects to the AP and initiates 802.1X.
4. The Enrollee‟s M1 message is proxied to all External Registrars as UPnP events.
Each active Registrar (Internal Registrar, if enabled, and all the External
Registrars that have subscribed to receive UPnP events from the AP) should
send M2 or M2D.
5. The two external Registrars send M2D messages to the AP. The AP queues
these up for delivery to the Enrollee.
6.The AP sequentially delivers the M2D messages to the Enrollee, which responds
with ACK messages to each one. After the last M2D has been delivered without
a WSC_MSG response, the AP sends EAP-Failure to terminate the 802.1X
connection.
Phase 2:
1. Enter PIN in ER.
2. Registrar notifies the AP when it becomes active by setting the Selected Registrar attribute to TRUE
3. After the AP receives a SetSelectedRegistrar UPnP action with Selected Registrar TRUE, AP incorporates Selected Registrar flag set to TRUE in its Beacons and Probe Responses
4. Enrollee reconnects and restarts the 802.1X authentication. This time, Registrar sends an M2 message rather than an M2D message.
5. The Enrollee and Registrar engage in the complete Registration Protocol until the
Enrollee is provisioned with its Credential.
Response Type set to AP.
After this M1 to M8 exchange occurs. Enrollee (the station) may decide to associate to a WSC-enabled AP and initiate the registration protocol by sending message M1 to the Registrar; assuming that
the Registrar is not yet prepared to enroll the candidate enrollee it will respond with message M2D.
M2D – this message indicates that the Registrar is unable to authenticate with the Enrollee, but it is willing to provide descriptive information about the Registrar to the Enrollee.
1. The Enrollee sends its Discovery message using an 802.11 probe request. The
Discovery message is broadcast by the AP to all external Registrars.
2. The AP responds to the probe request with its own Discovery data.
3. The Enrollee connects to the AP and initiates 802.1X.
4. The Enrollee‟s M1 message is proxied to all External Registrars as UPnP events.
Each active Registrar (Internal Registrar, if enabled, and all the External
Registrars that have subscribed to receive UPnP events from the AP) should
send M2 or M2D.
5. The two external Registrars send M2D messages to the AP. The AP queues
these up for delivery to the Enrollee.
6.The AP sequentially delivers the M2D messages to the Enrollee, which responds
with ACK messages to each one. After the last M2D has been delivered without
a WSC_MSG response, the AP sends EAP-Failure to terminate the 802.1X
connection.
Phase 2:
1. Enter PIN in ER.
2. Registrar notifies the AP when it becomes active by setting the Selected Registrar attribute to TRUE
3. After the AP receives a SetSelectedRegistrar UPnP action with Selected Registrar TRUE, AP incorporates Selected Registrar flag set to TRUE in its Beacons and Probe Responses
4. Enrollee reconnects and restarts the 802.1X authentication. This time, Registrar sends an M2 message rather than an M2D message.
5. The Enrollee and Registrar engage in the complete Registration Protocol until the
Enrollee is provisioned with its Credential.